How to prepare and plant new aquarium plants
The box has arrived and the plants look nothing like the tank photos. Here is exactly what to do with potted, tissue-culture and clip-on plants — from unboxing to the first few weeks — without the scare stories.

First, take a breath — and know what you are looking at
New aquarium plants almost never look like the lush, colourful images that sold them to you. They arrive small, sometimes pale, often flattened from the post, and grown in a form that looks subtly wrong. That is normal, and this guide exists because most of the advice online is either three throwaway lines (“just plant them”) or a wall of chemistry that reads like a lab manual. The truth sits in between: there are a handful of things that genuinely matter, and once you understand why, the whole process is quick and calm.
This guide assumes one sensible thing: that you bought your plants from a reputable aquatic specialist — the likes of Horizon Aquatics, Aquarium Gardens, or your trusted local shop — rather than from an unknown source or someone’s pond. Good suppliers grow or handle stock cleanly, which lets us skip the bleach-dip horror stories that put beginners off before they start. If your plants came from a well-run store, you simply do not need them.
Do this the moment the box lands
Open it. Plants sealed in warm bags cook — a parcel left in a hot car or on a sunny windowsill can go from healthy to slimy in hours. Get them out of the packaging, sit them somewhere cool and shaded, and keep them damp (a splash of dechlorinated water or a spritz). Planting the same day is ideal, but if your tank is not ready, do not panic — how long you can hold plants covers exactly how long each format keeps and how to store it.
Most plants ship in one of three formats, and how you prepare them depends entirely on which you have. Sort your haul into those three piles first, then work through the relevant section below.
Potted, tissue culture, and bunched or clip-on
Nurseries sell the same species in different packaging for different reasons. Recognising each on sight tells you immediately how to treat it.
- Potted plants arrive in a small mesh net-pot, the roots packed in rockwool — a spun mineral-wool wadding that holds moisture during transport. Most potted stock is grown emersed (out of water, roots wet, leaves in humid air), which is why the leaves can look different from the submerged form you are expecting.
- Tissue culture comes in a small sealed cup, the plantlets sitting in a clear or cloudy nutrient gel. These are grown in sterile laboratory conditions from a few cells, which is their great advantage: they are essentially guaranteed free of snails, snail eggs, algae, and pesticide residue. They look tiny and fragile because they are — but you get a lot of individual plantlets in one cup.
- Bunched and clip-on plants arrive as loose stems held by a soft lead strip or rubber band, or — for epiphytes like Anubias, Java fern and Bucephalandra — already fixed to a small stainless clip, wedge or pad, ready to attach to your hardscape.
How long you can hold plants — and how to keep them alive
Plans slip. The hardscape is not right, the substrate has not settled, the tank is still cloudy, or life simply got in the way. This is the most common unanswered question in the whole process, so here is the direct answer: plant on arrival if you can, but every format tolerates a delay, and one of them tolerates weeks.
The thing to understand is that time is rarely what kills a held plant. Heat, crowding and drying out are what kill it. A cup left on a sunny windowsill can die in an afternoon; the same cup on a cool shelf is fine a fortnight later. Manage those three risks and the delay itself is a minor issue.
Realistic holding windows
| Format | Comfortable window |
|---|---|
| Sealed tissue-culture cup | 1–3 weeks |
| Epiphytes on clips or pads | Up to ~2 weeks |
| Potted plants in rockwool | Several days |
| Loose bunched stems | 3–4 days |
Note that the order runs opposite to how fragile the plants look. Tissue culture appears to be the most delicate thing in the box and is in fact the most robust in storage, because it is sealed, sterile, and sitting in its own food supply. Loose stems look sturdy and fail first, because they have no roots, no medium and no reserves.
How to hold each format
- Tissue culture — do nothing at all. Leave the cup sealed and upright on a cool shelf at roughly 18–22 °C, in ordinary room light or under a desk lamp. Do not open it “to check” — the seal is the whole point, and once it is broken the sterility is gone. Keep it well away from windows and radiators.
- Epiphytes — leave them on their clips. Anubias, Java fern and Bucephalandra are the toughest things you will unbox. Either keep them barely damp in a vented bag, or drop them straight into a holding tub of water. A week is trivial for these.
- Potted plants — damp, not drowned. Leave the pot and rockwool on; that is what is keeping the root ball together and moist. Put the whole pot in a clear tub or a loosely-closed food bag with a little moisture, somewhere cool and dim, and mist it if it looks dry. Leave the bag or tub slightly open — a completely airtight container invites mould.
- Bunched stems — the only ones needing real effort. Get true aquatics (Vallisneria, Blyxa, most sold as loose submerged stems) into water straight away. And the critical part: spread them out in a single loose layer. Stems piled on top of each other start rotting from the bottom in three or four days. It is density, not time, that gets people.
The holding tub, if you need one
If you are holding anything in water for more than a day or two, a clean food-grade tub or bucket is all it takes: dechlorinated water (or old tank water, which brings some nutrients with it), an airstone, and a cheap LED on a timer for about eight hours a day. Keep it at room temperature and out of direct sun, change some water weekly, and do not crowd it. Hobbyists routinely hold plants in exactly this setup for several weeks, so a few days has an enormous safety margin.
If you already have an established tank running, that is an even better parking space — stable water, filtration and light already sorted. The one trade-off is that anything living in that tank, snails included, can hitch a ride into your new setup. If the new tank is meant to start pest-free, use the tub.
The three things that actually kill held plants
1. Heat and direct sun. The inside of a sealed cup in sunlight can climb past 40 °C, which is fatal within hours. A cool, shaded shelf is the whole trick. 2. Crowding. Stems layered in a bucket rot from the bottom up in three to four days — give them room. 3. Drying out. The failure mode for bag storage; a light mist every couple of days prevents it.
And do not use the fridge. It is too cold for tropical plants, too dark, and the temperature swings every time the door opens. Suppliers who cold-store do it at a controlled 10–15 °C, which your kitchen fridge is not.
Checking a tissue-culture cup before you use it
Worth knowing regardless of how long you held it, because the clock did not start when the box arrived. A cup may already have spent months moving through the supply chain, and there is no date on it you can read. Before opening, look for:
- Reject it if the gel has gone cloudy, watery or liquefied, if it is very dark or brown, if there is white cottony or web-like fuzz, if the plantlets are translucent, brown or collapsed into the medium, or if the lid is damaged or lifting. A sour or rotten smell on opening is decisive.
- Do not worry about a little yellowing, plantlets that look small and pale next to the tank photo, visible white roots, leaves shaped differently from the mature plant, or a red species arriving green. All of that is normal in culture and corrects itself once the plant is growing submerged.
- Plants pressed hard against the lid mean the cup is getting on and you should plant it soon — but it is a prompt, not an emergency.
Keeping shrimp? The delay is an advantage.
Plants grown in nurseries may carry fertiliser or pesticide residue. Fish usually tolerate the trace amounts involved, but shrimp and other invertebrates are far more sensitive — particularly to anything copper-based — and for them it can be lethal. Tissue culture is exempt — it is grown sterile in a lab. For potted and bunched stock going into a shrimp tank, Dennerle recommends soaking the plants in fresh water for about three days with several water changes before planting.3 So if you were holding them anyway, you have just done the shrimp-safety step for free.
One honest note on all of the above: the tissue-culture figures come from vendors who publish them, but no nursery publishes a maximum holding time for potted plants or epiphytes — and Tropica, the biggest name in tissue culture, publishes no storage guidance at all. Those numbers are drawn from consistent, widely-repeated hobby and retail practice rather than from anything measured. They are reliable enough to plan around, and I would not treat them as precise.
Out of the pot, out of the wool
The single most common beginner question is whether to bury the whole pot. Don’t. The net-pot and rockwool are packaging, not part of the plant, and burying them traps detritus and can rot the base. Removing them takes a minute:
- Squeeze the pot gently to loosen it, then slide the plant and its rockwool plug out whole.
- Tease the rockwool away from the roots with your fingers, working from the outside in. It pulls apart like candy floss. A short soak in a bowl of water makes stubborn plugs let go more easily.
- Rinse the roots in a bowl of dechlorinated water to remove the last fibres. A few strands left clinging deep in the root mass are harmless — do not shred healthy roots chasing them.
- Divide and trim. One pot is usually several plants; separate them so each has its own roots. Trimming long roots back to roughly 2–3 cm is common practice — it makes planting far easier and generally prompts a flush of fresh roots into your substrate. Firm white roots are healthy; the sign to remove one is softness, not colour — snip off any that are mushy or slimy, but keep firm tan roots, which are perfectly normal.
Why the leaves look wrong
Emersed-grown plants build leaves suited to air. Once submerged, many species shed those leaves and grow a new, submerged-adapted form — a real, well-documented form of phenotypic plasticity in amphibious plants.1 This is why a potted plant can look shabby for a fortnight and then transform. Do not judge a plant by the leaves it arrived with.
Rinse the gel, split into clumps
Tissue culture is the most beginner-friendly format precisely because it is so clean, but the nutrient gel must come off. That gel is a sugar-and-mineral medium; left on the roots in your tank it feeds a short-lived bacterial or algal bloom.
- Lift the plantlet mat out of the cup in one piece.
- Rinse thoroughly under a gentle tap or in a bowl of dechlorinated water, teasing the gel out from between the roots until the water runs clear. Be patient but gentle — the roots are fine as hair.
- Divide into small portions. This is the key move for carpeting plants. Split the mat into many little clumps — for a foreground carpet, portions the size of a match-head to a pea, each with a few leaves and roots. Lots of small, well-spaced portions carpet faster and more evenly than a few big lumps.
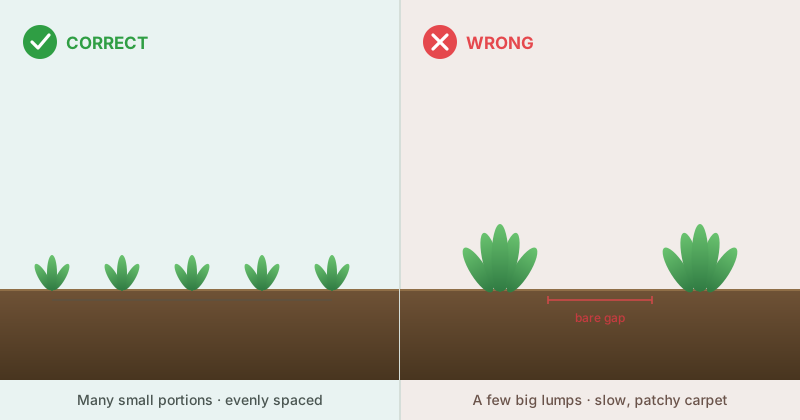
Because tissue culture starts sterile, it is the format to choose if pest snails or algae have burned you before — from a sealed, intact cup there is genuinely nothing to dip or quarantine.
Lose the band, respect the rhizome
For bunched stems, remove the lead strip or rubber band and discard it. Left on, it crushes and rots the stems it binds — the bunch is only tied for transport. Separate the stems into individual pieces so each can be planted with space around it, and strip the lowest pair of leaves from any stem so the buried node is bare.
For epiphytes — Anubias, Java fern, Bucephalandra, mosses — there is one rule that matters more than any other: never bury the rhizome. The rhizome is the thick horizontal stem the leaves and roots grow from; buried in substrate it suffocates and rots, which is the usual reason a new Anubias slowly dies. These plants are designed to grip wood and rock, not to sit in the ground.
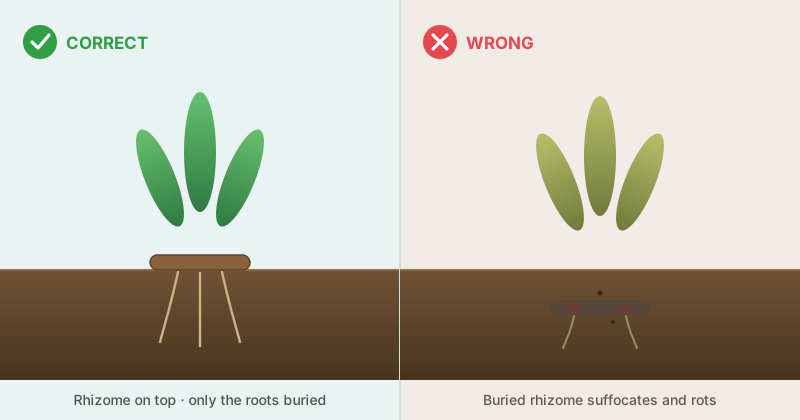
- If it arrived on a clip or pad, you can simply wedge that clip into your hardscape — it is made to.
- To attach a bare rhizome, hold it against wood or rock and secure it with a dab of cyanoacrylate gel superglue (safe and inert once cured underwater), or tie it on with cotton thread or fine fishing line. Roots grip within a few weeks. Cotton thread then rots away on its own and can be left; fishing line is nylon and will not — snip it off once the plant has gripped, or it stays in the tank permanently and can cut into the rhizome as it thickens.
- Only the roots may touch the substrate if you prefer to nestle rather than glue — keep the rhizome itself proud of the surface.
You almost certainly do not need to panic
The internet loves a bleach-dip drama. In practice, if you bought from a good specialist and chose tissue culture where you could, your risk of importing pest snails, planaria or nuisance algae is low. A sensible, proportionate routine is enough:
- Look before you plant. Give potted and bunched plants a good look for tiny snails and jelly-like egg clutches on the leaves, and rinse them under running water. A firm rinse dislodges loose snails and surface debris; adherent egg clutches are more stubborn, so pick off by hand any you spot. This is not a sterilising step — it is a sensible, proportionate check for clean stock.
- Lean on tissue culture for anything you want to be certain about — it is sterile by design, provided the cup arrived sealed and intact.
- Skip the harsh chemistry. Bleach and peroxide dips exist, but they are fiddly, easy to get wrong, and unnecessary for clean stock from a reputable source. This guide deliberately does not send beginners down that road. If you want zero risk on potted or bunched stock, the answer is to buy tissue culture rather than to reach for bleach.
- Shrimp keepers, one extra step. The risk that matters for invertebrates is not snails but nursery pesticide and fertiliser residue, which fish shrug off and shrimp may not. Tissue culture is exempt. For everything else, a multi-day soak with water changes before planting is the recommended precaution — see holding plants above.
Planting technique, plant by plant
A pair of aquascaping tweezers (pinsettes) transforms this job — they let you push a plant in at an angle and release it below the surface without churning the substrate. Fingers work for larger plants, but for anything small, tweezers are worth every penny. Plant into a substrate that is damp but not yet flooded, or filled just an inch or two, so you can see what you are doing; top up afterwards.
- Stem plants (Rotala, Ludwigia, Hygrophila): grip a single stem low down, push the bare node 2–3 cm into the substrate at a slight angle, and release. Angling helps them stay put. Space stems a finger-width apart — crowded stems shade each other and thin out at the base.
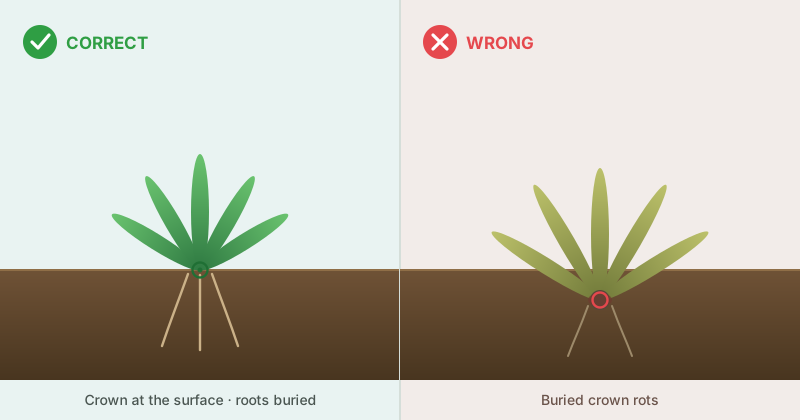
- Rosette plants (Cryptocoryne, Amazon sword): plant so the crown — the point where leaves meet roots — sits right at the substrate surface. Bury the roots, never the crown; a buried crown rots.
- Carpeting plants (tissue-culture portions): dot the small clumps across the foreground a couple of centimetres apart, pushing each just deep enough to anchor. They spread to fill the gaps — even coverage beats depth.
- Epiphytes: attach to hardscape as above — do not plant them at all.
- Floating plants (Salvinia, frogbit): simply rest them on the surface. Nothing to plant.
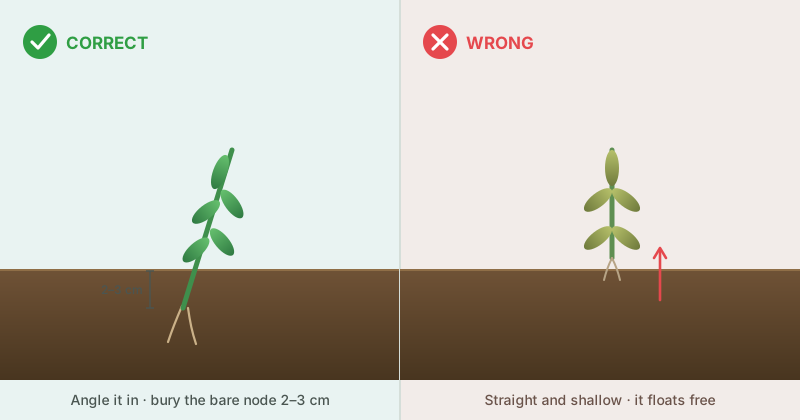
“Plant the roots, never the crown or the rhizome. Almost every slow new-plant death comes from breaking that one rule.”
What to expect — and what not to panic about
Here is the part that catches everyone out. In the first week or two, many new plants look worse: leaves go translucent, soft, or fall away entirely. This is melt, and for emersed-grown and tissue-culture plants it is usually not death but a changeover — the plant is discarding air-adapted leaves and rebuilding a submerged form suited to your tank.1 Crypts are especially notorious for it. The worst thing you can do is rip the plant out; the roots and crown are often working away below, ready to push new growth.
The way through melt is stability, not intervention:
- Keep conditions steady. New plants settle best when the water is not a moving target. If your tank is brand new, understand that it is also cycling — our guide to the nitrogen cycle explains what is happening to ammonia, nitrite and nitrate in those first weeks.
- Go easy on light at first. A shorter photoperiod and modest intensity while roots establish gives algae less to exploit on stressed leaves. Our guide to how much light plants need covers sensible starting points.
- Match support to demand. As plants root and start growing submerged, they begin drawing on CO2 and nutrients — see keeping CO2 stable and when nutrient dosing actually matters. A nutrient-rich aquasoil substrate does a lot of this work for you early on.
- Trim, don’t pull. Snip off fully melted, mushy leaves so they do not foul the water, but leave the plant in place. New leaves that appear after planting are the true sign of health.
Our dedicated guide to plant melt goes deeper on why it happens and how to tell recoverable melt from genuine loss.
If something looks off in week one
- Stems or carpets floating up. Very common at first — roots have not gripped yet. Replant the escapees; angling stems and planting a touch deeper helps. Turning the flow down for a day or two while they root can help too.
- Leaves melting. Expected, as above. Trim the mush, hold your nerve, keep conditions stable.
- A little algae on old leaves. Stressed, slow-growing new leaves are easy targets. It usually fades as the plant establishes and starts out-competing it; resist cranking the light.
- Anubias or fern going yellow and rotting at the base. Check you have not buried the rhizome. Lift it clear of the substrate and re-attach to hardscape.
The one-paragraph version
Get plants out of hot packaging fast. Sort them by format. Remove rockwool and net-pots from potted plants, rinse and divide; rinse the gel off tissue culture and split it into many small portions; bin the lead band on bunched stems and never bury the rhizome of an epiphyte — glue or tie it to hardscape instead. Buy from a reputable supplier and a quick rinse-and-look is all the quarantine you need. Plant roots into the substrate with the crown at the surface, use tweezers for the small stuff, and then expect melt: emersed-grown leaves die back and regrow submerged. Hold your nerve, keep conditions stable, go gentle on light, and judge success by the new growth.
When you are choosing what to plant where, our plant profiles list each species’ placement, difficulty and light needs, and the plant species lookup lets you check a plant’s requirements before you buy. Once you know what you want, the UK plant price comparison shows what each of seven shops is charging for it and whether they have it in stock — and will work out the cheapest way to buy a whole list once postage is counted.
- Wells, C.L. & Pigliucci, M. (2000). Adaptive phenotypic plasticity: the case of heterophylly in aquatic plants. Perspectives in Plant Ecology, Evolution and Systematics, 3(1), 1–18. doi:10.1078/1433-8319-00001 — reviews how amphibious plants produce distinct emersed and submerged leaf forms, the mechanism underlying transition “melt”.
- Note on evidence: the leaf-form transition (heterophylly) and the sterility of tissue culture are well established. The specific handling and planting techniques in this guide — rockwool removal, root and stem trimming, planting depth, epiphyte attachment, and the holding times in the storage section — are long-standing horticultural best practice within the aquarium hobby rather than conclusions from peer-reviewed research. They are presented as practical, widely-relied-upon methods, not laboratory findings.
- Holding and storage guidance is drawn from published supplier instructions, chiefly Aquasabi’s in-vitro shipping and storage notes (temperature limits, the >40 °C sealed-cup hazard, damp storage method), Buce Plant’s storage help page (1–3 week tissue-culture window, holding-tub method, the warning against airtight containers and refrigeration), and Dennerle’s plant-care guide (the multi-day soak for shrimp tanks). Suppliers differ on some points — notably whether emersed-grown potted plants are better held damp or submerged — and those disagreements are noted in the text rather than resolved. Figures for potted plants and epiphytes have no published nursery source and reflect consistent hobby practice only.
Comments
Add yoursNo comments yet — be the first to share your experience.